
What is a tenant move-out inspection checklist and why does it matter?
A tenant move-out inspection checklist is the written record a landlord or property manager uses to document a rental unit's condition at the end of a lease. It captures the state of every room, fixture, appliance, and surface so you have clear, dated evidence when calculating security deposit deductions or preparing a unit for the next resident.
The checklist serves both sides of the lease. Landlords get a defensible paper trail if a dispute reaches small claims court. Tenants get a fair, transparent accounting of what they're being charged for, and why. Without it, both parties are arguing from memory.
A complete move-out inspection form typically covers:
- Room-by-room condition ratings (walls, floors, ceilings, doors, windows)
- Appliances and fixtures (refrigerator, stove, dishwasher, sinks, toilets, HVAC filters)
- Cleaning status (kitchen surfaces, bathrooms, carpets, blinds)
- Damage documentation with photo references and written descriptions
- Keys, remotes, and access devices returned or missing
- Smoke and carbon monoxide detectors present and functional
- Final meter readings for utilities billed to the unit
The HUD Move-In/Move-Out Inspection Form is the federal baseline many property managers adapt. It covers bathrooms, kitchens, living areas, other equipment, and requires signatures from both the manager and resident at move-in and move-out. Courts and rental boards treat a signed, itemized form as the gold standard when deposit disputes arise.
The primary goal of any move-out inspection is to distinguish normal wear and tear from tenant-caused damage. That distinction determines what you can lawfully deduct from a security deposit, and getting it wrong in either direction creates problems.
Table of Contents
- How to complete a move-out inspection checklist, step by step
- How to tell normal wear and tear from actual tenant damage
- What US law requires for move-out inspections
- How to run a joint move-out inspection with your tenant
- Common mistakes that create deposit disputes and inspection problems
- Best practices for inspection documentation and workflow management
- Final meter readings and utility responsibilities
- How to communicate cleaning and repair expectations to tenants
- When to schedule follow-up inspections after the initial move-out walkthrough
- How to estimate and charge for damages beyond normal wear and tear
- How to handle disputed inspection findings
- TurnTrack keeps your inspection records and turnover workflow in one place
- Key Takeaways
How to complete a move-out inspection checklist, step by step
A detailed move-out inspection typically lasts 30 to 60 minutes for an average unit, or longer if extensive damage is present. Rushing it is one of the most common and costly mistakes a property manager can make.
1. Schedule the inspection and notify the tenant
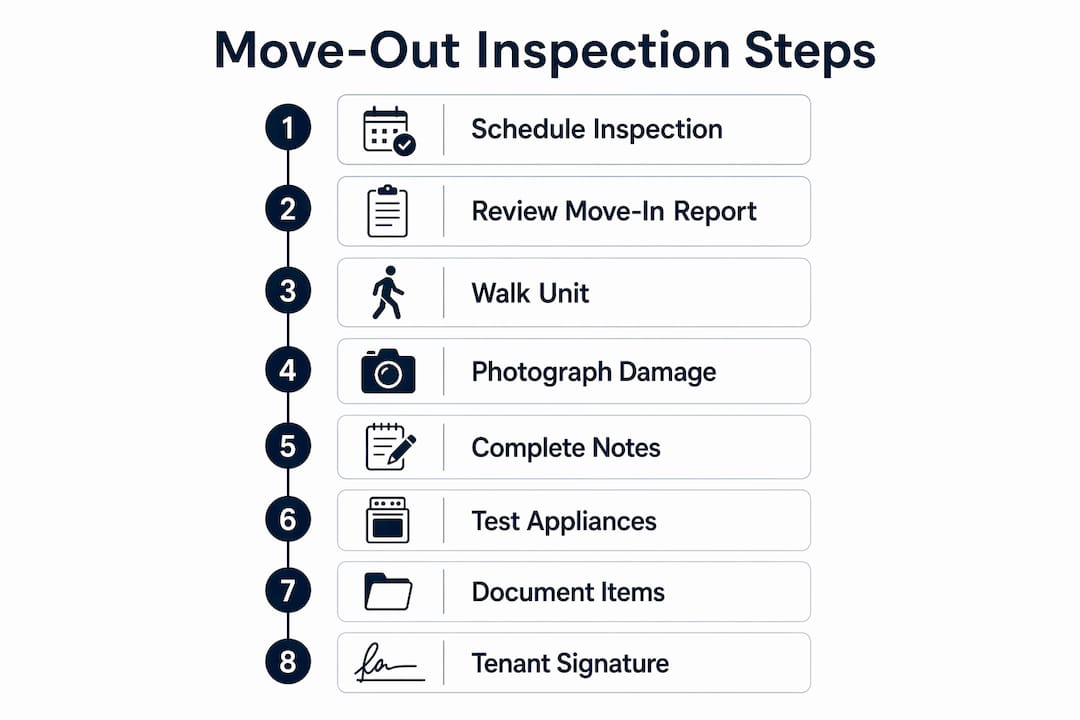
Set the inspection date before or on the move-out date. Most states require written notice to the tenant. In California, Civil Code §1950.5(f) gives tenants the right to request an initial pre-move-out inspection, which must be offered within a reasonable time before the lease ends. Check your state's specific notice window.
2. Pull the move-in report and prior documentation
Before you walk the unit, review the original condition report and any photos taken at move-in. Courts limit deductions without matched move-in and move-out evidence. Side-by-side comparison is the only way to prove a condition changed during the tenancy.

3. Walk the unit room by room
Go in a consistent order every time: entry, living room, kitchen, bedrooms, bathrooms, laundry area, storage, exterior or balcony. Detailed, room-by-room checklists prevent missed items and keep turnover timelines on track.
4. Photograph everything before you write a single note
Take wide shots of each room, then close-ups of any damage. Photographic evidence should include wide shots, close-ups with scale references, and timestamps to hold up in a dispute. A ruler or coin next to a stain or hole gives the photo context a judge can actually use.
5. Complete the condition ratings and written notes
Use a standardized rating scale: Good, Fair, Poor, or Damaged. Write specific descriptions, not vague labels. "Large burn mark on kitchen counter, approximately 3 inches, near stove" is defensible. "Counter damaged" is not.
6. Check appliances, fixtures, and safety equipment
Test every appliance, run every faucet, flush every toilet, and cycle every light switch. Confirm smoke detectors and carbon monoxide detectors are present and functional. Note HVAC filter condition and any missing or broken items.
7. Document items left behind
Abandoned property requires written notice before disposal. State-specific laws govern how long you must store abandoned items and what notice you must give the tenant before disposing of them. Note every item left in the unit on the checklist.
8. Have the tenant sign the completed form
Both parties should sign the move-out inspection form. The HUD form includes a section where the resident can agree or disagree with the findings and list specific items of dispute. A tenant signature is not a legal waiver, but it documents that they were present and had the opportunity to respond.
Sample inspection table:
| Area | Item | Move-In Condition | Move-Out Condition | Notes |
|---|---|---|---|---|
| Kitchen | Countertop | Good | Poor | Burn mark near stove, approx. 3 in. |
| Kitchen | Refrigerator | Good | Fair | Interior dirty, no damage |
| Living Room | Carpet | Good | Fair | Normal wear pattern, no stains |
| Bathroom | Toilet | Good | Good | Clean and functional |
| Bedroom 1 | Wall paint | Good | Poor | Large scuff marks, two holes |
| All | Smoke detectors | Present/functional | Present/functional | Batteries replaced |
How to tell normal wear and tear from actual tenant damage
This is where most deposit disputes start. Normal wear and tear covers minor scuffs, small nail holes, faded paint, and typical carpet wear patterns. These are the natural results of someone living in a space, and landlords cannot deduct for them.
Tenant damage is something else entirely. It goes beyond what ordinary use causes, and it is the landlord's burden to prove the distinction clearly.
| Normal Wear and Tear | Tenant Damage |
|---|---|
| Small nail holes from picture hanging | Large holes punched in drywall |
| Faded or lightly scuffed paint | Crayon or marker drawings on walls |
| Carpet worn along traffic paths | Carpet stained with pet urine or bleach |
| Loose door hinges from regular use | Door kicked off hinges or frame cracked |
| Minor scratches on hardwood floors | Deep gouges or burns on hardwood |
| Faded caulk around tub | Mold from unreported water leak |
| Light dust on blinds | Broken or missing blind slats |
The age of the item matters too. A carpet that was already eight years old at move-in cannot be charged as a full replacement when it shows wear at move-out. Most courts apply a depreciation standard, meaning you can only charge for the remaining useful life of the damaged item, not its full replacement cost.
Pro Tip: When photographing damage, place a ruler or a common object like a coin next to the area for scale. Write the description in the checklist before you leave the unit, while the details are still fresh. Vague lump-sum deduction statements are rejected by courts; itemized, photo-backed damage lists are what hold up.
What US law requires for move-out inspections
State law governs most of the procedural requirements for move-out inspections, and the rules vary more than most landlords expect.
Security deposit return timelines are the most commonly litigated issue. Many states require landlords to return security deposits or provide itemized deduction statements within a few weeks after move-out, depending on jurisdiction. Missing that window can cost you the right to make any deductions at all.
Key state-specific rules to know:
- California (Civ. §1950.5): Landlords must offer a pre-move-out inspection upon tenant request. AB 2801, effective January 1, 2025, requires landlords to take photos of the unit at the start of any tenancy, before any repairs or cleaning after a tenant vacates, and after any repairs or cleaning. Deposit must be returned within 21 days with an itemized statement.
- New York: Landlords must return deposits within 14 days for most residential tenancies, with an itemized statement of deductions.
- Texas: Landlords have 30 days to return the deposit or provide a written description of deductions.
- Florida: The landlord must give written notice of intent to make a claim within 30 days of move-out, or forfeit the right to deduct.
- Washington: Deposit must be returned within 21 days, with a written statement of deductions.
Some states require landlords to offer a pre-move-out inspection, giving tenants the chance to fix issues before the final walkthrough and deposit assessment. Even where it is not legally required, offering one is a practical way to reduce disputes.
Tenants have the right to attend the final inspection in most states. Refusing to allow tenant attendance, or conducting the inspection without notice, can undermine your ability to enforce deductions. The California DRE landlord-tenant guidebook is one of the clearest plain-language resources for understanding these obligations.
Itemization is not optional. Specific damage descriptions with supporting photos are increasingly required and help pass scrutiny from rental boards and courts. A line item that reads "cleaning fee: $300" without specifics will not survive a challenge.
How to run a joint move-out inspection with your tenant
Inviting the tenant to the final inspection is one of the most effective things a landlord can do to prevent a dispute. Joint inspections provide immediate shared agreement on unit condition, which cuts the back-and-forth that turns into small claims court filings.
Here is how to do it well:
- Send a written invitation at least 48 hours before the scheduled inspection, via email or text so you have a record.
- Bring the original move-in report and walk through it item by item with the tenant present.
- Point out damage as you find it rather than presenting a bill after the fact. Tenants are far more likely to accept a charge they watched you document.
- Let the tenant speak. If they disagree with a finding, note their objection on the form. The HUD form has a specific section for this.
- Document attendance or absence. If the tenant declines to attend or does not show up, note the date, time, and method of invitation on the checklist. Proceed with the inspection and photograph everything.
- Have both parties sign. Even if the tenant disagrees with some findings, their signature confirms they were present and the inspection occurred.
When a tenant does decline to participate, conduct the inspection exactly as you would with them present. The documentation process does not change. What changes is that you lose the chance to resolve disagreements on the spot, so your photos and written notes need to be even more thorough.
Pro Tip: Offering a pre-move-out walkthrough two to four weeks before the lease ends gives tenants time to fix issues themselves. Pre-move-out inspections reduce deposit disputes by giving tenants a chance to cure deficiencies early, and they cost you nothing but an hour of time.
Common mistakes that create deposit disputes and inspection problems
Most security deposit disputes trace back to one of a handful of avoidable errors. Here is where landlords and property managers consistently go wrong:
- Waiting too long after vacancy. Inspect the unit on or immediately after the move-out date. Delays create questions about when damage occurred and who caused it.
- Skipping the move-in comparison. A damage claim without a matching move-in baseline is nearly impossible to enforce. Pull the original report before you walk the unit.
- Writing vague descriptions. "Damaged wall" is not a deduction. "Three-inch hole in drywall, bedroom 2, east wall, approximately 4 feet from floor" is.
- Poor or missing photos. Blurry, poorly lit, or undated photos carry almost no weight in a dispute. Use your phone's timestamp feature and take more photos than you think you need.
- Missing the deposit return deadline. Many states penalize landlords who miss the return window with double or triple damages. Know your state's timeline before the tenant moves out.
- Forgetting to give tenants a repair opportunity. In states that require a pre-move-out inspection, skipping this step can void your right to make deductions entirely.
- Inconsistent inspection sequences. Skipping rooms or inspecting in a different order each time leads to missed items and gaps in documentation.
Pro Tip: Build a fixed inspection sequence and follow it every single time, regardless of how obvious the damage is in one room. Starting with the entry and ending with the exterior means nothing gets skipped when you are managing multiple turns at once.
Best practices for inspection documentation and workflow management
Good documentation is a business asset, not just a legal requirement. A standardized checklist ensures nothing is overlooked and keeps turnover on schedule. The difference between a landlord who wins deposit disputes and one who loses them is almost always the quality of the paper trail.
Specific practices that hold up under scrutiny:
- Side-by-side photo comparisons. Place the move-in photo next to the move-out photo for the same area. This is the single most persuasive format for a rental board or judge.
- Date-stamped images with scale references. A ruler or coin in the frame gives context. A timestamp proves when the photo was taken.
- Standardized forms used consistently. The Colorado Condition of Rental Property Checklist and the HUD form are both solid templates to adapt. Consistency across every unit in your portfolio makes your documentation far more credible.
- Audit-ready itemized damage statements. Each deduction line should include: the item, the specific damage, the estimated repair or replacement cost, and the photo reference. Vague lump-sum statements are rejected by courts.
- Digital coordination tools. Property managers running multiple turns simultaneously benefit from a shared workflow where inspection notes, photos, and vendor tasks live in one place rather than scattered across texts and emails. Tools that tie photos directly to inspection items, and flag units as On Track or At Risk, reduce the chance that a unit gets shown before it is ready or a vendor gets missed entirely. For a deeper look at how audit trails in property management protect you during disputes, the workflow principles apply directly to inspection documentation.
The inspection record you create today is the evidence you will rely on six months from now if a dispute surfaces. Treat it accordingly.
Final meter readings and utility responsibilities
Utility handoffs are one of the most overlooked parts of a move-out, and they create real problems when billing disputes surface weeks later.
On or before the move-out date, record the final reading for every meter tied to the unit: electric, gas, water, and any sub-metered services. Note the date, time, and the name of the person who took the reading. Photograph the meter display alongside a piece of paper showing the unit number and date.
Utility move-out checklist:
- Electric meter: final reading recorded and photographed
- Gas meter: final reading recorded and photographed
- Water meter (if sub-metered): final reading recorded
- Thermostat set to a property-standard temperature after tenant departure
- HVAC filter condition noted and filter replaced if required by lease
- Water heater confirmed operational and set to standard temperature
- All utilities confirmed in the landlord's or property manager's name as of the move-out date
Confirm with your utility providers when the transfer of service takes effect. Some providers require 24–48 hours' notice to process a transfer. If a tenant leaves utilities in their name and the account lapses, you may face reconnection fees or gaps in service that affect the next resident's move-in.
For commercial tenants, the utility handoff is more complex. A commercial tenant move-out inspection form should include separate line items for each metered service, the date of final reading, and confirmation that the tenant has notified each utility provider of the vacate date.
How to communicate cleaning and repair expectations to tenants
Tenants who know exactly what is expected of them before they move out are far less likely to dispute charges afterward. The time to set those expectations is not the day of the inspection. It is at lease signing, at the pre-move-out walkthrough, and in a written move-out instruction letter sent 30–60 days before the lease ends.
A clear move-out instruction letter should cover:
- Required cleaning standards for each area (kitchen appliances, bathroom fixtures, floors, windows)
- Whether professional carpet cleaning is required by the lease
- How to handle nail holes and minor wall repairs
- What counts as acceptable condition versus what will result in a charge
- The date and time of the scheduled inspection
- Contact information for questions
Be specific. "Leave the unit in the same condition as move-in, normal wear and tear excepted" is the legal standard, but it does not tell a tenant whether they need to clean inside the oven or replace a broken towel bar. The more specific your written instructions, the fewer surprises on inspection day.
Some landlords include a cleaning checklist as an attachment to the move-out letter. The UC Santa Cruz Move-Out Checklist is a good example of a plain-language format that covers kitchen, bathroom, bedroom, and common area expectations without legal jargon.
When to schedule follow-up inspections after the initial move-out walkthrough
The initial move-out inspection is not always the last one. Several situations call for a follow-up walkthrough before the unit is turned over to the next resident.
When a follow-up inspection makes sense:
- After cleaning and repairs are completed. A mid-turn inspection confirms that vendors finished the work correctly and that no new issues appeared during the turnover process. This is especially useful when contractors are working in the unit over several days.
- When damage was found but not fully assessed. If you discovered water damage, mold, or structural issues during the initial walkthrough, a follow-up after remediation confirms the scope of the repair and documents the final condition.
- Before the move-in inspection. A final pre-move-in walkthrough, conducted after all work is complete, creates the new baseline for the incoming tenant. This is the condition report they will sign at move-in.
- When the initial inspection was incomplete. If the tenant was still removing belongings during the first walkthrough, schedule a second visit once the unit is fully vacated.
Document every follow-up inspection with the same rigor as the initial one. Date, photos, written notes, and a clear record of who conducted the walkthrough. The make-ready process from move-out through final inspection is a sequence, not a single event, and each stage needs its own record.
How to estimate and charge for damages beyond normal wear and tear
Once you have documented the damage, the next step is calculating what you can lawfully charge. The process has three parts: establish the damage, determine the cost to repair or replace, and apply depreciation where required.
Step 1: Get written repair estimates. For anything beyond minor cleaning, obtain at least one written estimate from a licensed contractor or vendor. The estimate should specify the work, the materials, and the cost. This becomes part of your itemized deduction statement.
Step 2: Apply depreciation. Courts in most states require landlords to account for the age and condition of the damaged item. A carpet with a 10-year useful life that was already five years old at move-in has roughly half its value remaining. You can charge for that remaining value, not the full replacement cost. The same logic applies to paint, appliances, and flooring.
Step 3: Prepare an itemized deduction statement. Each line item should include the specific damage, the location, the repair or replacement cost, the depreciated amount charged, and a reference to the supporting photo. Send this statement to the tenant within your state's required timeframe along with any remaining deposit balance.
Charges that courts consistently reject: flat cleaning fees with no itemization, full replacement costs for old items, and deductions for conditions that existed at move-in. Charges that hold up: specific repair costs backed by vendor invoices, documented damage that did not exist at move-in, and cleaning charges tied to specific areas with photos showing the condition.
How to handle disputed inspection findings
Disputes happen even when your documentation is solid. The way you respond in the first 48 hours usually determines whether the issue resolves quickly or ends up in small claims court.
When a tenant disputes a finding, start by reviewing your documentation. If your photos, move-in comparison, and written notes clearly support the charge, respond in writing with the specific evidence. Attach the relevant photos and reference the move-in condition report. Most disputes end here when the landlord can produce a clear before-and-after record.
If the tenant raises a point you cannot easily counter, consider whether a partial adjustment is appropriate. A charge that is partly legitimate and partly questionable is better resolved with a reasonable compromise than a court filing that costs both parties time and money.
For formal disputes, small claims court is the most common venue. The filing limit varies by state, typically ranging from $5,000 to $10,000 for residential deposit disputes. Bring your complete inspection file: the original move-in report, the move-out checklist, all photos with timestamps, vendor invoices, and any written communication with the tenant. Judges in these cases look for specificity and consistency. A landlord who can show a clear, dated, room-by-room record almost always prevails over one who cannot.
Some cities have local rent boards that handle deposit disputes outside of court. Oakland's Rent Adjustment Program and Berkeley's Rent Board both offer mediation and hearing processes for deposit-related complaints. Check whether your city has a similar program before filing in court.
TurnTrack keeps your inspection records and turnover workflow in one place
Running five to fifteen active turns at once means inspection records, vendor contacts, and unit conditions scattered across texts, emails, and memory. One missed vendor or a unit shown before it is ready costs more than the time it takes to fix the process.
TurnTrack is a subscription-based workspace built specifically for property managers and service managers running unit turns. Every turn has a shared record with a live status (Ready, On Track, At Risk, Overdue) and a timeline the whole team can see: Move-Out, Tech Start, Cleaners, Carpet, Inspection, Make-Ready. Move-Out, Mid-Turn, and Move-In inspections are walked area by area on a phone, building a before-and-after condition record as you go. Photos attach directly to inspection items where the property requires them, not forced on every task. The Property Standards Library keeps unit-specific specs (paint colors, filter sizes, preferred vendors) in one place and shares them to a tech or vendor without requiring them to have a TurnTrack account.
One subscription covers your invited team. Free trial available on iOS. If your current process lives in your phone and a spreadsheet, start a free trial and see what a shared turn record actually changes.
Key Takeaways
A complete, photo-backed move-out inspection checklist is the single most effective tool for protecting security deposit claims and preventing disputes from reaching court.
| Point | Details |
|---|---|
| Document at move-in and move-out | Courts limit deductions without matched move-in and move-out evidence; always compare both records. |
| Know your state's deposit deadline | Most states require landlords to return security deposits or provide itemized deduction statements within 14 to 45 days after move-out, depending on jurisdiction. Missing this window can void your right to make any deductions. |
| Itemize every charge | Vague lump-sum deduction statements are rejected by courts; each line needs a description, cost, and photo reference. |
| Offer a pre-move-out walkthrough | Pre-move-out inspections reduce disputes by giving tenants a chance to fix issues before the final assessment. |
| TurnTrack for multi-turn management | TurnTrack's subscription workspace ties inspections, vendor coordination, and unit status into one shared record for property teams. |